Building a backyard ninja course can turn an ordinary garden into an active training space for children and adults. It does not require expensive commercial equipment or a large property. With careful planning, reclaimed timber, sturdy rope, and basic climbing holds can create challenging obstacles at manageable costs. This guide explains How to build a backyard ninja course on a budget while keeping safety and durability central.
A practical course begins with the available space. Measure the yard, mark clear walking paths, and leave generous landing zones beneath elevated obstacles. A low balance beam, homemade stepping platforms, and a simple cargo net can provide variety without complicated construction. Use outdoor-rated screws, inspect wood for cracks, and follow each product manufacturer’s weight recommendations. Soft mulch or certified playground surfacing can reduce injury risks, although it still cannot replace supervision.
Real experience often reveals flaws that plans miss. A beam may feel stable but wobble after rain. A rope obstacle may hang too high for younger users. Test every station slowly before inviting anyone to use it. Start with fewer obstacles, then improve the course after observing movement, comfort, and wear. My first layout would probably have included too many challenges too close together. That mistake matters. A budget course should feel purposeful, not crowded. With honest testing, regular maintenance, and age-appropriate design, a backyard ninja course can become a reliable space for strength, balance, confidence, and family activity.
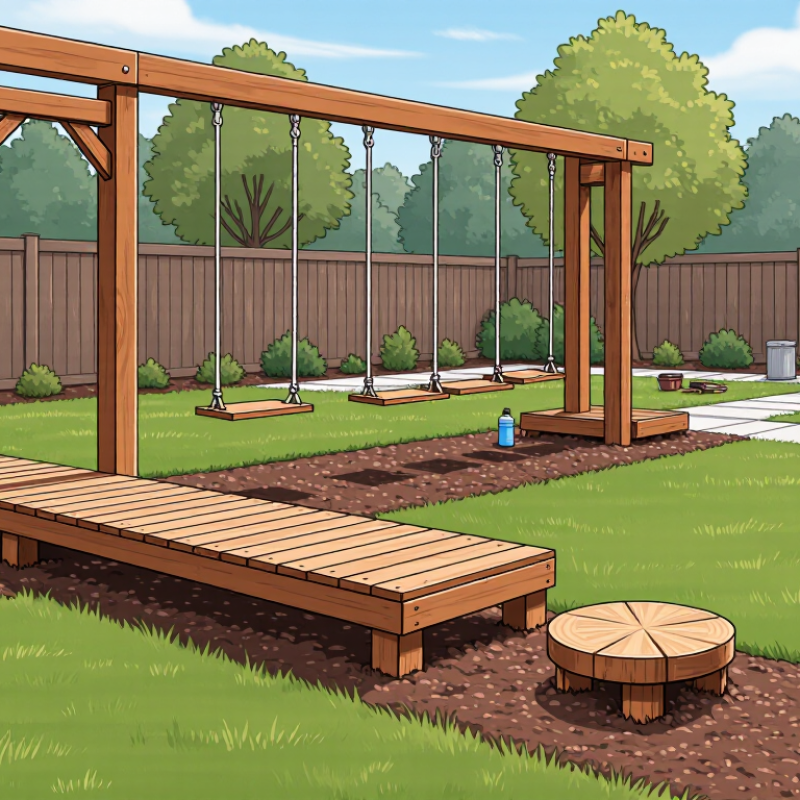
A backyard ninja course can turn unused space into a practical movement area. The main benefit is not expensive equipment. It is repeated, playful activity close to home. The World Health Organization’s 2020 guidelines recommend at least 60 minutes of moderate-to-vigorous activity daily for children and adolescents. A short course can support that target through crawling, jumping, balancing, and climbing. It will not replace varied exercise. Still, it makes movement easier to repeat.
A budget-friendly design also reduces the cost barrier for families. The 2024 Outdoor Participation Trends Report recorded 175.8 million American outdoor participants in 2023. That figure reflects strong interest in accessible outdoor activity. A backyard setup offers similar convenience without travel fees or membership costs.
Use sturdy timber, outdoor rope, recycled tires, and adjustable obstacles. Change the layout every few weeks. Children usually need novelty, not perfection. Adults can join too, which adds useful modeling and shared practice.
Safety must guide every saving decision. The U.S. Consumer Product Safety Commission recommends protective surfacing, clear fall zones, and regular equipment inspections. Place landing areas away from walls, fences, and sharp edges. Begin with low obstacles. My first layout looked exciting but sat too high for younger users. I rebuilt it lower, then added difficulty gradually. That correction cost time, but it revealed an important weakness: an impressive course is not always a usable one. Check knots, screws, wood splinters, and ground stability before each session.
Why Build a Backyard Ninja Course on a Budget?
Planning the Course Layout, Goals, and Available Space
A backyard ninja course should begin with a clear purpose, not expensive equipment. Decide whether children need strength, balance, coordination, or simply active play. The World Health Organization’s 2020 physical activity guidelines recommend at least 60 minutes of moderate-to-vigorous activity daily for children and teenagers. A short course can support that target through climbing, jumping, crawling, and repeated attempts.
Measure the usable space before drawing obstacles. Mark a rectangle with string, then note trees, fences, drainage areas, and low branches. Leave wide landing zones between stations. The U.S. Consumer Product Safety Commission recommends protective surfacing and adequate fall zones around playground equipment. A backyard setup needs the same caution. Grass may look soft, but compacted soil can become unforgiving. Rubber mulch, engineered wood fiber, or approved impact surfacing may reduce risk.
My first sketch was too ambitious. It placed six obstacles in a narrow strip. That looked exciting on paper, but movement became crowded. A better layout uses three or four stations with clear sightlines. Place low balance beams near the entrance, followed by stepping targets and a hanging element. Keep the highest challenge last. Allow different routes for beginners and stronger users. The 2023 Global Wellness Institute research describes functional movement as a growing focus in recreational fitness, yet metrics can distract from real use. Watch how the course feels. Does a child hesitate at one turn? Is the landing too short? Change the design, even after construction.
Building a backyard ninja course can be affordable without making safety an afterthought. The right materials matter more than flashy features. I learned this after my first layout used thin boards that flexed under weight. They looked fine, but they felt unreliable.
Choose exterior-rated lumber with smooth, rounded edges. Inspect every board for cracks, knots, and splinters before installation. Galvanized bolts resist outdoor moisture better than ordinary screws. Use thick, weather-resistant rope for climbing elements, and secure each connection with hardware rated for repeated loads. Concrete footings add stability, but they should sit below the local frost line when needed. Check local building guidance before digging.
Soft landing areas deserve equal attention. Install impact-absorbing rubber tiles, engineered wood fiber, or another tested playground surface beneath elevated obstacles. Avoid loose household mats; they can slide or compress unevenly. Keep platforms low while testing the course. I prefer adjustable obstacles because children grow quickly, although adjustment points can loosen over time. That weakness requires regular checks. Look for rust, movement, frayed rope, and exposed fasteners every few weeks. A careful budget saves money twice: during construction and after preventable repairs. Safety remains unfinished until the course survives real weather, repeated use, and honest inspection.
Why Build a Backyard Ninja Course on a Budget?
A backyard ninja course can grow with your child’s ability. Start with low, simple obstacles: stepping stones, a balance beam, and floor-level crawling lanes. Use treated outdoor timber, rounded edges, and secure ground anchors. The World Health Organization’s 2020 Guidelines recommend at least 60 minutes of moderate-to-vigorous activity daily for children and teenagers. Short obstacle sessions can support that target through climbing, jumping, balancing, and carrying.
Keep beginner obstacles close to the ground. Leave soft landing space around every landing point. For intermediate users, raise the beam slightly, add angled steps, or create a short rope traverse. Advanced obstacles can include hanging grips and wider gaps, but increase only one challenge at a time. The U.S. Consumer Product Safety Commission’s Public Playground Safety Handbook stresses protective surfacing, fall zones, and regular equipment checks. Those principles apply at home, even without commercial equipment.
Test each obstacle with slow movements before inviting faster play. I once made a balance beam too narrow, and children avoided it completely. That mistake taught me to measure challenge, not appearance. Inspect bolts, ropes, wood splinters, and loose soil weekly. Keep a simple progress chart, but allow children to repeat easier obstacles. Confidence often grows there. A budget course should feel adjustable, not permanent.
| Skill Level | Obstacle | Recommended Dimensions | Main Materials | Estimated DIY Cost | Primary Skills | Step-by-Step Build Focus | Safety Considerations |
|---|---|---|---|---|---|---|---|
| Beginner | Balance Beam | 2.4 m long × 10 cm wide × 10 cm high | Untreated or outdoor-rated timber, ground stakes, exterior screws | $25–$45 | Balance, coordination, controlled foot placement | Level the ground, secure the beam to stakes, round or sand sharp edges, then mark a clear start and finish. | Keep the beam close to ground level and place soft landing material beside it. |
| Beginner | Stepping-Stone Path | 6–8 platforms; 20–30 cm apart | Low timber blocks or solid outdoor pavers, non-slip surface material | $20–$50 | Single-leg balance, rhythm, lower-body control | Arrange platforms in a straight line first, test spacing, and gradually add small changes in direction. | Use stable platforms that cannot rock or rotate. Avoid smooth surfaces when wet. |
| Beginner | Low Hurdles | 3–4 hurdles; 20–35 cm high | Timber rails, rounded posts, ground anchors | $30–$60 | Jumping, landing, leg strength | Install pairs of posts, attach removable rails, and begin with the lowest height before increasing it. | Use rails that can fall away or detach if hit. Keep adequate space between hurdles. |
| Beginner | Incline Climbing Ramp | 1.8 m long × 0.75 m wide; 20–30° incline | Exterior plywood, timber frame, textured foothold strips, screws | $60–$100 | Pulling, pushing, grip development, climbing technique | Build a braced triangular frame, attach the climbing panel, add evenly spaced foothold strips, and check every joint. | Use a low incline for beginners and provide a padded landing zone at the upper and lower ends. |
| Intermediate | Monkey Bars | 2.4–3 m long × 0.75–0.9 m wide; 1.8–2.1 m high | Pressure-treated structural timber, galvanized metal bars, post anchors | $150–$280 | Grip strength, swinging, shoulder stability | Set posts in stable footings, install cross-bracing, space bars about 30–35 cm apart, and test the frame progressively. | Confirm that the structure does not sway excessively. Use deep, stable footings and thick impact-absorbing surfacing. |
| Intermediate | Rope Traverse | 3–4 m long; 1.2–1.5 m high | Weather-resistant rope, timber support posts, rated connectors | $80–$160 | Grip endurance, core stability, lateral movement | Install two or more sturdy supports, tension the rope without over-tightening, and add a lower support rope for easier progression. | Use rope intended for outdoor load-bearing applications. Inspect for fraying, looseness, and water damage regularly. |
| Intermediate | Salmon-Ladder-Style Rungs | 1.8–2.1 m high; 5–7 rungs | Heavy structural timber, rounded wooden rungs, diagonal braces | $120–$220 | Explosive pulling, timing, coordination | Build a rigid angled frame, install evenly spaced rungs, practice with a low first rung, and increase the challenge gradually. | This obstacle creates a higher fall risk. Use only with supervision and substantial impact-absorbing ground cover. |
| Intermediate | Angled Wall | 1.8–2.1 m high × 1.2 m wide; 10–20° backward angle | Exterior plywood, structural timber, climbing holds or timber blocks | $100–$200 | Running power, grip, upper-body strength | Construct a braced wall, cover the face with a durable textured finish, and mount holds in several difficulty patterns. | Round all edges, prevent side-to-side movement, and provide a clear padded landing area. |
| Advanced | Hanging Rings | 2–3 m span; 1.8–2.2 m hanging height | Outdoor-rated rings, load-rated straps or rope, reinforced overhead beam | $90–$180 | Grip strength, momentum control, shoulder stability | Reinforce the overhead beam, attach straps at equal spacing, and begin with rings positioned low enough for assisted practice. | Use only verified load-rated components. Check attachment points before every session and avoid sharp swinging angles. |
| Advanced | Climbing Net | 2.4 m high × 1.2 m wide; 25–35 mm rope grid | Outdoor climbing rope, strong perimeter frame, rated connectors | $180–$350 | Full-body climbing, grip endurance, route planning | Build a rigid rectangular frame, attach the perimeter rope first, weave the grid with consistent openings, and secure every junction. | Anchor the frame against tipping and use impact-absorbing surfacing beneath the entire climbing area. |
| Advanced | Warped Wall | 2.4–3 m high × 2.4 m wide; curved transition at the base | Structural timber, exterior plywood, non-slip running surface, bracing | $250–$500 | Acceleration, jumping, pulling, body positioning | Create a smooth curved frame, reinforce the back, attach a durable textured face, and begin with a lower wall or assisted climb. | Reserve this obstacle for experienced users. Maintain a large clear run-up and landing zone with no hard objects nearby. |
| All Levels | Landing and Safety Zone | At least 1.8 m beyond high-risk obstacles; depth matched to obstacle height | Engineered wood fiber, clean sand, rubber safety surfacing, or thick gym mats | $100–$400 | Safe landing, confidence, recovery | Remove rocks and roots, level the area, install impact-absorbing material, and maintain a consistent depth around each obstacle. | Inspect after heavy rain and replace compacted or displaced material. Do not rely on grass alone for elevated obstacles. |
| Budget planning note: A small beginner course can often be assembled for approximately $150–$300 using simple timber obstacles, while a larger mixed-level course with climbing and elevated elements may cost approximately $700–$1,800. Costs vary with local material prices, ground preparation, structural requirements, and the amount of safety surfacing. All elevated obstacles should be checked regularly for loose fasteners, rot, corrosion, instability, and worn ropes. | |||||||
A backyard ninja course can be affordable, but safety should guide every design choice. Before each use, walk around the structure slowly. Check posts for movement, wood for cracks, and metal parts for rust. Pull each handle and hanging obstacle firmly. Nothing should twist, loosen, or make an unusual sound.
Look at the ground, too. Soft soil can hide shifting supports after heavy rain. Keep a clear landing area beneath climbing elements, with impact-absorbing material placed evenly. Remove stones, toys, and exposed roots. Ropes should feel dry and secure, not fuzzy or stretched. I once focused too much on tight bolts and missed a worn knot. That mistake changed my inspection routine.
Maintenance works best when it is regular and visible. Mark inspection dates on a simple paper near the course. Tighten hardware when needed, but avoid forcing damaged parts back into service. Replace questionable ropes, cracked boards, and bent connectors. Do not rely on appearance alone. Children should use obstacles suited to their age, size, and ability, with an adult watching nearby. Set rules before play: one person per obstacle, no pushing, and stop during rain or strong wind. Even careful builders can overlook something. Recheck the course after storms, repairs, or long periods without use. Safety is never finished.
Protective surfacing is one of the most important safety investments for a backyard ninja course. This chart shows the critical fall height listed by the U.S. Consumer Product Safety Commission for common loose-fill materials installed at a 9-inch depth. Inspect landing areas regularly, redistribute displaced material, and replace material that has compacted or fallen below the recommended depth. Always match obstacles to the user's age and ability, and supervise use.
Source: U.S. Consumer Product Safety Commission, Public Playground Safety Handbook, Table 2. Local regulations and manufacturer instructions may require additional protection.
It turns unused yard space into a practical movement area. Children can crawl, jump, balance, and climb near home. Travel costs and membership fees are avoided. It does not replace varied exercise. Still, repeated play becomes easier.
Short sessions can support children’s daily movement goals. Activities may include jumping, climbing, carrying, and balancing. Adults can participate and model safe movement. Sixty minutes is a useful target. One course cannot provide everything.
Choose exterior-rated timber with smooth, rounded edges. Use thick outdoor rope and galvanized bolts. Recycled tires may support simple ground obstacles. Inspect every board for cracks and splinters. Cheap materials can become expensive later.
Start with floor-level crawling lanes and stepping stones. Add a low balance beam later. Keep obstacles close to the ground. Leave soft landing space around each activity. Simple feels safer.
Raise a beam slightly or add angled steps for intermediate users. Advanced users may try hanging grips or wider gaps. Increase only one difficulty at a time. Adjustable obstacles can grow with children. Adjustment points may loosen, though.
Use impact-absorbing rubber tiles or tested playground surfacing. Engineered wood fiber can also provide cushioning. Avoid loose household mats because they may slide. Keep landing zones away from walls and fences. Clear space matters.
Check bolts, knots, ropes, wood, and ground stability before use. Perform a detailed inspection every few weeks. Look for rust, movement, frayed rope, and exposed fasteners. Test obstacles with slow movements first. I sometimes underestimated small changes.
Do not design for appearance alone. My first layout was too high for younger users. Another beam was too narrow, so children avoided it. Lower obstacles and adjust spacing gradually. A usable course beats an impressive one.
Building a backyard ninja course on a budget is a practical way to encourage fitness, creativity, confidence, and outdoor family fun without requiring expensive equipment. Learning how to build a backyard ninja course on a budget begins with defining the users’ goals, available space, and skill levels. A simple layout can include beginner, intermediate, and advanced obstacles while leaving enough room for safe movement, landing, and supervision.
Affordable materials such as sturdy untreated wood, strong rope, weather-resistant fasteners, and soft ground coverings can create durable obstacles when selected and installed carefully. Build each feature step by step, starting with low and simple challenges before adding height or complexity. Every obstacle should be inspected for sharp edges, loose connections, wear, and instability before use. Regular maintenance, clear safety rules, proper warm-ups, and adult supervision help keep the course enjoyable and secure for everyone.

ProGear Sport